How can you manually add marks to Folders in Windows 7? The Window Explorer of Windows 7 is much different from XP. One of the differences is that the left side is defaulted to show the navigation pane which displays in the way of tree structure. It lets you quickly locate a certain folder in deep layers. However, it is not considerate enough without conspicuously marking the current folder. Luckily, we can manually add a conspicuous mark for it.
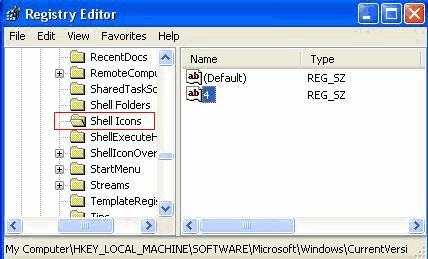
Preparatory work: you need to collect some icon files with transparent background in .ico format and put them in a fixed place. Then let’s begin to operate. Firstly, start Registry Editor and locate in HKEY_LOCAL_MACHINE\SOFTWARE\Microsoft\Windows\Current Version\explorer\Shell Icons.
Remark: If you can not find “Shell Icons” after extending “explorer”, Please right-click “explorer” to “new build” an “item” and rename it as “Shell Icons” (make sure of the correct case and the blank space between the words).
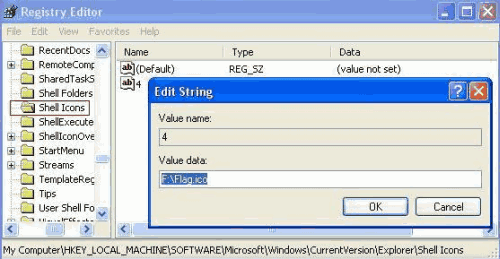
Secondly, right-click the blank in the right side pane to create a new “string value” and name it as “4” (in case if this “4” did not exist). Thirdly, right-click “4” to choose “modify” and fill in the “Value Data” with full path for the icon you want. Finally, click OK and exit the Registry Editor.
Now, logoff and login again to open the Windows Explorer. Can you find if the icon of the chosen folder is changed? Change is not only here. You can look at the program folder in the Start menu or start the Registry Editor to have a look.
Guest author Bob is a freelance writer and software developer for Touchupsoft.com. You can also write a guest article and share your expert tips.


