How to Make a Transparent Laptop Screen in 5 Easy Steps
A transparent laptop screen is a fun visual trick: your laptop looks see-through, as if you can see the wall, desk or view behind it. The screen isn’t actually transparent. You take a photo of what’s behind the laptop, crop it to fit, set it as your wallpaper and line everything up. We first shared this in 2005 after seeing a popular Flickr gallery of these photos, and it works even better with today’s phone cameras and high-resolution screens. Here’s how to do it in five steps.
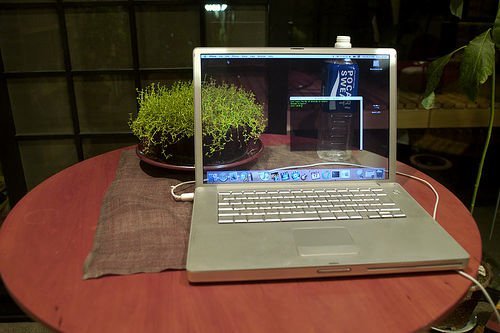
Quick answer: Put the laptop where you want it, move it aside and photograph the background from your viewing position, crop the photo to the exact area the screen covers, resize it to your screen resolution, set it as your desktop wallpaper with “Fill”, then put the laptop back and adjust the angle until the edges line up. Hide the taskbar and desktop icons for the best effect.
Table of Contents
What you need
- A phone or camera (any modern phone is enough).
- A tripod or something to keep the camera in the same place.
- An image editor: Photopea (free, in the browser), GIMP, Photoshop, or the Photos app built into Windows and macOS.
- Your screen resolution: on Windows, Settings > System > Display; on a Mac, Apple menu > System Settings > Displays.
How to make a transparent laptop screen in 5 steps
Step 1: Set up and take the photo
Place the laptop exactly where it will sit and note the screen angle. Put your camera where the viewer’s eyes (or the final photo’s camera) will be. Then move the laptop out of the way without moving the camera, and take a photo of the background. Keep the lighting the same.
Step 2: Crop to the screen area
Put the laptop back and take a second photo from the same spot. Use it as a guide to see exactly which part of the background the screen covers, then crop the first photo to that area.
Step 3: Resize to your screen resolution
Resize the cropped image to match your display, for example 1920×1080 for a Full HD screen or 2560×1600 for many newer laptops. Keep the aspect ratio correct and don’t stretch it; if the shape doesn’t match, crop a little more instead.
Step 4: Set it as your wallpaper
On Windows 11, right-click the image and choose “Set as desktop background”, or go to Settings > Personalization > Background and choose “Fill”. On a Mac, open System Settings > Wallpaper and add the photo. Hide desktop icons and auto-hide the taskbar or Dock so nothing breaks the illusion. (Turn off any app that changes your desktop background daily, or it will replace your photo.)
Step 5: Line it up
Return the laptop to its spot and adjust the screen angle and brightness until the wallpaper edges meet the real background. Take your final photo from the same camera position. Small shifts in viewpoint break the effect, which is why these photos work best from one fixed angle.
Tips for a better result
- Match the screen brightness to the room so the screen doesn’t glow.
- Busy backgrounds with straight lines (bookshelves, tiles, windows) make the illusion most convincing.
- Use a matte screen or avoid reflections from windows and lamps.
- If you want a quick fake instead, editing apps can also cut out the screen and fill it with the background in a single photo.
Credit: the photo above comes from the classic Flickr transparent screens gallery (image by Caterina).
FAQ
Can a laptop screen really be transparent?
Ordinary laptops can’t. Transparent OLED and microLED displays exist as concept and commercial demo products, but this trick uses a normal screen and a wallpaper.
Why doesn’t my transparent screen line up?
The camera or your eyes moved, or the screen angle changed. Shoot and view from the same fixed position.
What resolution should the wallpaper be?
The same as your screen’s native resolution, so it isn’t scaled or blurred.