How to Remove Background Using PowerPoint (Free, No Photoshop)
Need to remove the background from an image but don’t have Photoshop? You can remove background using PowerPoint, which you probably already have. Its built-in background remover finds the main subject automatically, and for most photos it’s a one-click job. It’s perfect for presentations, product photos, YouTube thumbnails and social media images where you want the subject to pop out on a clean, transparent background.
Quick answer: Insert the image in PowerPoint, select it and go to Picture Format > Remove Background. PowerPoint marks the background in pink. Use Mark Areas to Keep or Mark Areas to Remove to fix any mistakes, then click Keep Changes. To save it, right-click the picture, choose Save as Picture and pick PNG to keep the transparent background.
Table of Contents
How to remove background using PowerPoint
These steps work in PowerPoint for Microsoft 365, PowerPoint 2024, 2021 and 2019 on Windows and Mac.
1. Insert the image and open Remove Background
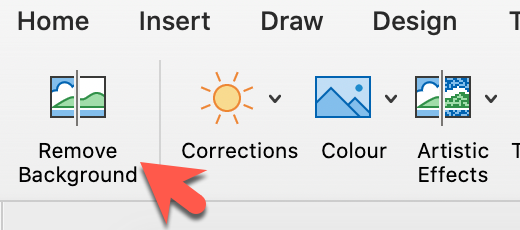
Insert or paste your image into a slide, then click it once to select it (or double-click it). The Picture Format tab opens. Click Remove Background at the far left of the toolbar.
2. Check what PowerPoint selected
PowerPoint analyses the image, detects the main subject, and colours the background it plans to remove in magenta (pink). Everything that isn’t pink will be kept.

For a simple image with a clear subject and sharp edges, the selection is usually right first time.
3. Fine-tune the selection
If the image is more complex, or the subject blends into the background, use the tools on the Background Removal tab:
- Mark Areas to Keep: draw over parts of the subject that turned pink by mistake.
- Mark Areas to Remove: draw over background areas that PowerPoint missed.

Zoom in on the slide for more precise marks. Short strokes work better than large scribbles.
4. Keep the changes
When you’re happy, click Keep Changes (or just click outside the picture). The background disappears, and you can move the image over any colour or slide design. Click Discard All Changes to start again.
5. Save the image with a transparent background
To use the image outside PowerPoint, right-click it and choose Save as Picture. Pick PNG as the file type. PNG keeps the transparent background; JPG would fill it with white.
This step-by-step video shows the whole process:
Tips for better background removal
- Start with a high-resolution photo with good contrast between the subject and the background.
- Crop the image close to the subject first. PowerPoint detects the subject more accurately with less background.
- Hair, fur and glass are hard for any tool. Expect to use Mark Areas to Keep around fine edges.
- Use Picture Format > Artistic Effects or Corrections afterwards to blend the subject into a new background.
Other free ways to remove a background
PowerPoint isn’t the only option, and some are even faster:
- Microsoft Paint on Windows 11 has a one-click Remove background button.
- Word and Excel have the same Remove Background tool as PowerPoint, under Picture Format.
- Mac Preview and Photos: on recent macOS versions you can right-click the subject in a photo and copy it without its background.
- remove.bg and Canva: online tools that remove backgrounds automatically with AI, with free and paid options.
For quick edits like these, you don’t need expensive software such as Photoshop. Looking for more image tools? See our list of AI art generators for creating images from text.
Frequently asked questions
Is PowerPoint’s Remove Background free?
Yes. It’s included in every desktop version of PowerPoint, Word and Excel, at no extra cost.
Why is Remove Background greyed out?
It doesn’t work on vector images (SVG), icons, or multiple selected pictures. Select a single photo (JPG or PNG). Some older PowerPoint versions also lack the feature.
How do I save the image without the background?
Right-click the picture, choose Save as Picture and save it as a PNG file to keep the transparent background.
Can I undo the background removal later?
Yes. PowerPoint keeps the original image. Select it and click Picture Format > Reset Picture to restore it.
Get our free weekly email: new tech guides and tools, no spam.
New and updated tech guides, a free tool worth bookmarking and one useful pick, once a week. No spam, unsubscribe anytime.
One email a week. Unsubscribe anytime. See our privacy policy.